Sunday, 18 April 2021

Colour throwndown challenge ctd638


Hi everyone.

What beautiful weather we have had today in uk, the sunshine just makes everything seem so much better.


My card for this challenge was made using the new Pansy Patch dies from Stampin Up.

I started with a white card blank and layered with a Night of Navy layer. Next i had another layer of white which i have used my blending brush to add some yellow as a background.

I then used the wimsey dies to cut the outside design.

I die cut my pansy using Night of Navy, So saffron and garden green. This was made up and layered on my card using dimensionals. The greeting was stamped on white card and layered with navy.


I love the colours on this one and is such a beautiful set.

Thank you so much for checking out my blog, hope you liked my card

Enjoy the rest of your weekend.


Monday, 12 April 2021

Less is more colour challenge


Hi everyone

Back to work today, so no crafting for me tonight. Decided to complete my blog for the Less is more colour challenge.

I found this one difficult to only use the three colours and leave lots of white space. Thats why i like doing the challenges, they take you out of your comfort zone.

For this card i used a Smoky slate card base with a white layer on top.

I stamped the flowers from the Always in my heart stamp set by Stampin Up and die cut the leaves from the same set. The circle was cut from the stitched shape dies and stamped with a greeting.

I stamped some tiny hearts in grey behind the circle.

Everything was layered using dimensionals and glue dots.


Hope you like my entry and thank you for looking.

Saturday, 10 April 2021

Sunday stamp challenge, Slimline birthday card


Hi everyone

Hope you are all having a great weekend and doing lots of crafty things. I always promise myself I will but other things get in the way.

Here is my card for the most recent Sunday Stamp Challenge.


The challenge was to make a slimline card thats fits into a traditional business envelope.

I used the butterflies from Butterfly Bouquet from Stampin Up.

I had a white card base and layered with Pretty Peacock. I used an alphabet die set to cut the happy and stamped the word birthday in Pretty Peacock ink.

A dotty ribbon in white was wrapped around the layer before being added to the card.

The butterflies were die cut and layered with dimensionals and a few jewels were added for a little bit of sparkle.

I hope you liked my card and thank you for reading.

Sue x

Saturday, 3 April 2021

Just Add Ink Challenge blog


Hi everyone


Hope you are all having a good Easter break and doing lots of crafting.  I promised myself I would do some each day of the break but other things keep getting in the way, like housework etc.

Anyway today I made the card below for the Just add ink challenge.

My card base was Bumblebee, with the circle cut from the same colour using the Stitched dies. The square was also cut using the same dies but this time in white.

I then stamped the turtle from the Back on your feet stamp set and used blending pens to colour.

The strip was cut from Bumblebee designer paper using Curvy dies and stamped from the Back On Your feet stamps.

The card was finished with some green twine and two pearls


Unfortunately at the moment we seem to be needing more Get Well cards to send as we are unable to visit anyone.

All products used for this card are by Stamping Up.

Hope you like my card and continue to have a great Easter 


Monday, 11 January 2021

Demonstrator Training Program, January Blog Hop


Thank you for joining us for our Stampin' Up!® Demonstrator Monthly Team Blog Hop! 

We are a group of Stampin' Up!® Demonstrators from around the world that are taking part in training that is helping us to build a successful Stampin' Up!® business and reach some goals we have set. We really appreciate your support.

You may be starting here or have come from another blog - either way you can find the link list at the bottom of this post so that you can see every blog post and idea today.

My thank you card was made this month using the new Perennial Petals dies and some Paper Blooms Designer series paper,

To make my card, I used a standard card blank in Very Vanilla,  I cut my next layer from the designer paper.  

The bottom layer of the flowers was also cut from the same series of paper.  Next layer and leaves were cut from the Neutral collection designer paper.  The flowers were finished with centers cut from gold foil. 

The flowers were added to the card using dimensionals and the leaves using glue dots.

The thank you label was added last, again using dimensionals.


Thanks so much for stopping by today!

As mentioned at the top, this is a blog hop so make sure you 'hop' around to all the amazing projects on this hop! Click on the links below to visit them.

Do you need any of the products used on todays project?
Click on the Stampin Up link above to view my website.

BLOG HOP LINKS

Sunday, 27 December 2020


Hi everyone

Hope you all had a great Christmas and not too stuffed from so much food.  Christmas presents are now put away and time to play with new crafty supplies from Santa.

This card was created using a free stamp set and paper pack that is available from the new Sale a-bration brochure, which goes live on 5th January, 2021.  For this set you need to spend £90. The set is called Berry Blessings stamp set and Berry Delightful designer series paper.  The stamp set has 13 stamps which includes sentiments and the paper is 12No. 12 x 12 sheets, 6No. double sided designs x2.


To make:

I cut one sheet of Pacific Point card stock - 8.5 inch x 5.5 inch.
Score at 2 inch, 3.1/8, 5.3/8 and 6.5 inch

Cut 2No. DSP at 1.3/4 x 5.1/4 inch. Then the same again in a co-ordinating paper.

I folded the card using score lines, valley fold and mountain fold. Adhere the designer paper to both outside panels, and one to the centre.

I cut a label from celebration label die set and stamped my berry using Misty Moonlight and Granny Apple Green ink.  The small label was cut from Stitched shaped die set and stamped with the greeting. Both were attached using dimensionals.

Thank you so much for taking time to view my post.  Below are some of the items used to create this card. if you wish to purchase and live in UK, please follow the links


Wednesday, 18 November 2020

Curvy dies, Tic Tac Toe Challenge No. 090, Stampin Up


Hi everyone,

I am back with another card I made for the above Tic Tac Toe challenge. I chose the centre line downwards, blue, holiday and sparkle/shine.

My card base was Whisper white and covered in some navy linen card.

I die cut my white curves using the curvy die set from Stampin Up.

The little house and trees were cut using the Coming Home set and so were the stars. The greeting was cut from some of the designer paper in this suite.

Lastly the snow flakes were cut using the snowflakes wishes dies from Stampin up.


I have listed below some of the products used to make this card.


Thank you all for reading my blog post.

Saturday, 14 November 2020

Quite Curvy, Stampin Up, Freshly Made Sketch


Hi

Has everyone been crafting today, the weather here has not been good, so thats my excuse to craft.

Today i have been making my card for the Freshly Made Sketch challenge. I always find these challenges difficult as they need to be simple and clean and that is not typical of my cards.

I have used a card blank in Whisper white and layered it with a wood effect paper. I cut a strip of red card for the stripe and edged with flowers stamped using the Quite Curvy stamp and die set. The greeting was from the same set as were the birds.

The little bird house i cut out using the Coming Home dies.


Thank you so much for visiting my blog.  I have listed below some of the products I have used on this card.


Tuesday, 10 November 2020

Forever Fern - Stampin Up


Hi everyone,

Hope you are all okay and fitting in lots of crafting. 

We had the Stampin Up On Stage event at the weekend and of course it was virtual, so demonstrators from all over the world attended. This was my first event and it was amazing and so inspiring.

Today i have made a card to send to one of my pen pals.

This was made using the Forever Fern stamp and die set.

I used a standard Whisper White card blank and also cut layers using Misty Moonlight and another layer of Whisper White.

I then cut a circle using the stitched dies and stamped the word hello in the centre.

I stamped the leaves using Old Olive, Garden Green, Shaded Spruce and Misty Moonlight. I stamped extra in Misty Moonlight to add dimension. The gold leaves were also die cut from the same set. These were placed using dimensionals.


Thank you for taking time to view my blog, if you wish to purchase any of the products used, please see below and click the links. I would love to have you as a customer.


Garden Green ink pad, Stampin Up, Sue Allen


Old Olive ink pad, Stampin Up, Sue Allen


Shaded Spruce ink pad, Stampin Up, Sue Allen

Monday, 9 November 2020

Demonstrator Training support Blog Hop October 2020


Thank you for joining us for our Stampin' Up!® Demonstrator Monthly Team Blog Hop! 

We are a group of Stampin' Up!® Demonstrators from around the world that are taking part in training that is helping us to build a successful Stampin' Up!® business and reach some goals we have set. We really appreciate your support.

You may be starting here or have come from another blog - either way you can find the link list at the bottom of this post so that you can see every blog post and idea today.

My thank you card was made using the new Curvy Bundle which is available for demonstrators early. It becomes available to purchase early November.

To make my card, i used a standard card blank in whisper white. I cut the fancy borders with one of the edge dies in this set.  Next i stamped the star strip with seaside spray twice and thank you with pretty peacock.

I put a one inch strip of designer paper inside the card and finished with some glittery stars


Thanks so much for stopping by today!

As mentioned at the top, this is a blog hop so make sure you 'hop' around to all the amazing projects on this hop! Click on the links below to visit them.

Do you need any of the products used on todays project?
Click on the Stampin Up link above to view my website.

BLOG HOP LINKS


Sunday, 1 November 2020

Forever Fern - Stampin Up - Freshly Made Sketches 459


Hi everyone, hope you have all had a good weekend.

I managed to fit in a little bit of crafting today between housework.

I made my card for the Freshly Made Sketches 459. The sketch above is what we were working from.

I started with a Whisper White card blank. I cut my shapes using the curvy dies from Stampin up. One is cut from Forever Fern designer paper and the other side is cut from Just Jade designer paper.

Next i cut my leaves using the Forever Fern dies and Just Jade, Gold Foil and vellum.

I finished off with a bow and some pearls.


Hope you like my card and thanks for taking time to view my blog.

Saturday, 31 October 2020

Game on - Stampin Up The Spot Challenge 134


Hi

Happy weekend everyone, hope everyone is finding some crafty time.

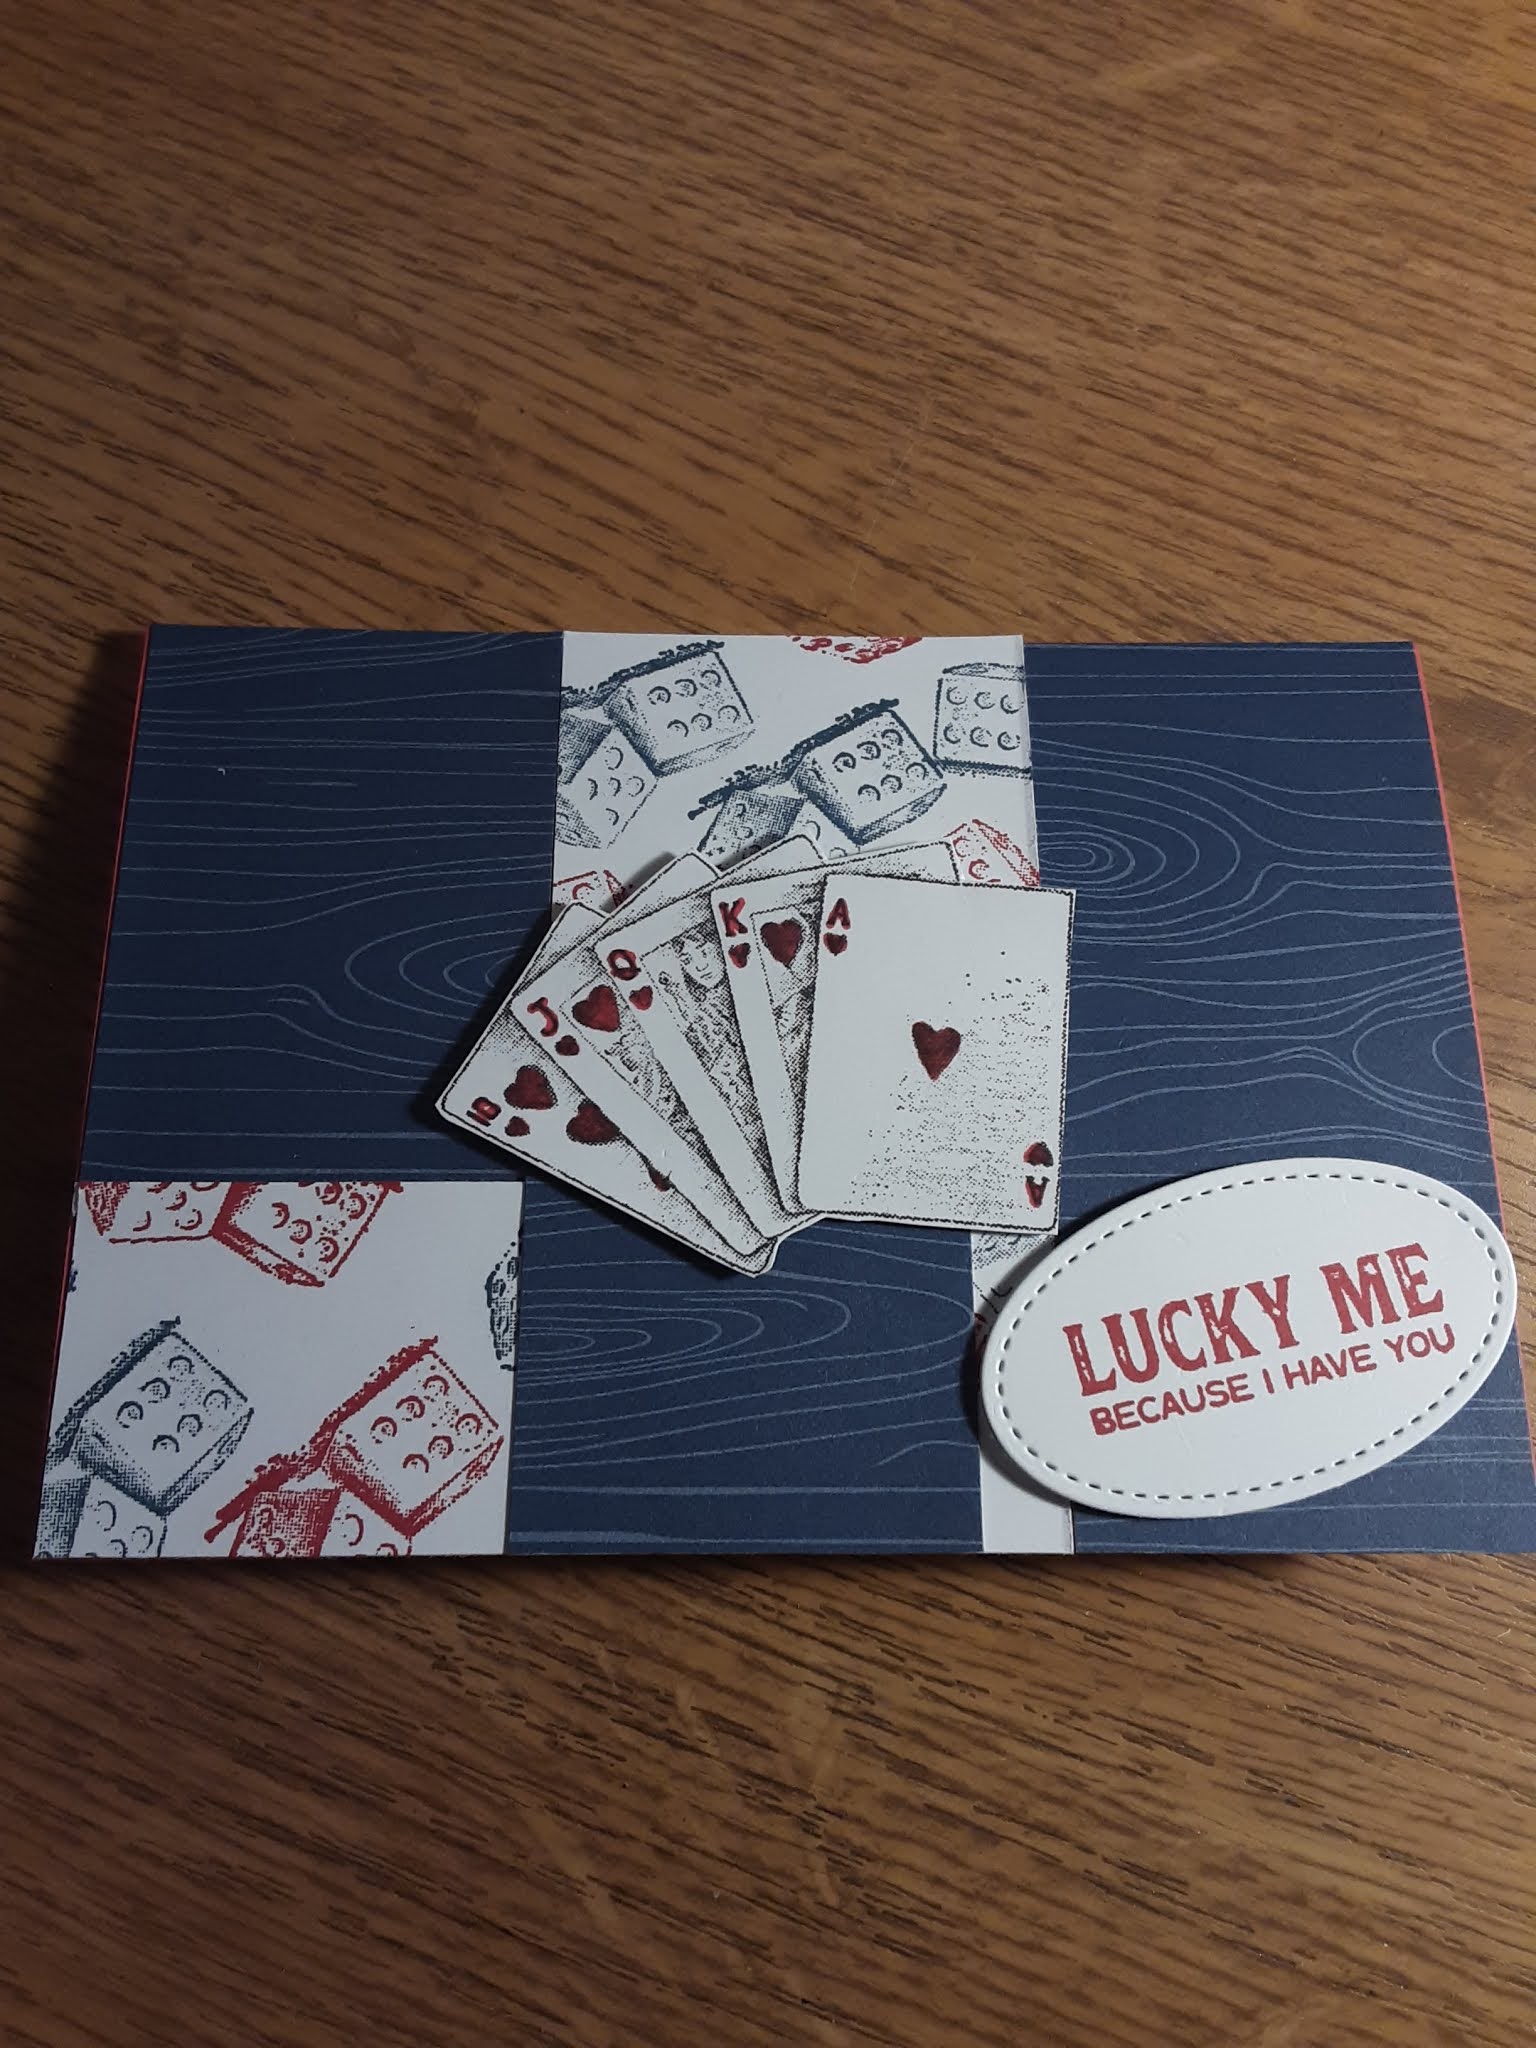
I have made a card for The Spot Challenge #134. This looked like it was going to be a fairly easy one, but how wrong can you be.

I started with a Real Red card base. I stamped the dice from Stampin Up Game on stamp set and also stamped the cards and greeting.

The hard part was getting the sections correct. I used a piece of misty moonlight designer paper and cut some of the sections. The other sections were cut from my stamped sheet.

The cards and greeting were mounted with dimensionals to give depth.


This is my finished card, hope you like it and thanks for taking the time to read my blog.


Wednesday, 28 October 2020

Coming home - Stampin up Tic Tac Toe Challenge No 087


Evening all, hope you have all had a good crafty day with it raining outside, at least it has where I live.

Anyway this evening I have created my card for the Tic Tac Toe challenge. I have gone with the top row.

I used a Whisper White card blank and cut another layer in the same. I cut out my oval using the stitched shape dies.

The background paper is from the Coming home suite. I then die cut the house and trees and used dimensionals to give depth.

My leaves were from the Forever fern set.


I added the wreath and used Wink of Stella to add a bit of sparkle to the trees, they look like they have frost on them.


Thank you for taking time to read my blog and I hope you like my card.

Sunday, 25 October 2020

The spot creative callenge - Stampin Up


Hi again, this time I am entering The Spot Creative Challenge #133. This one I found very difficult as I would not have thought to put these colours together.

I used Whisper White for my card blank and stamped dots from Forever Fern as the background in Pretty Peacock. I also stamped the leaves from the same set using the same ink.

I used the stitched shaped dies to cut my oval in Pumpkin Pie.

The flowers were cut from Poinsettia suite dies using the smallest flower, cut in Rich Razzleberry with a Pumpkin Pie centre. These were raised with dimensionals. A few gems added for sparkle.


Once again I hope you like my card, I must admit I do quite like the colours together.

Thank you for looking.

Have a great weekend and happy crafting x

Fusion card challenge - Stampin Up Poinsettia Place


Happy weekend everyone, hope you are all having a good one.  I went for my flu jab yesterday so was feeling sorry for myself.

Anyway I have made a card for the Fusion card challenge, Purple night. I went for the sketch challenge and used a card base in Highland Heather.

I cut strips 1 inch strips in black and Highland Heather, also cut a black strip on the diagonal. I stamped one strip with a lace effect stamp.

I cut the flower from the poinsettia place suite by Stampin Up. Just goes to show the poinsettia doesn't have to be red or cream.

I stamped the greeting from the Gift Wrapped stamp set, then finished off with a few spiders for Halloween.


Thank you for taking time to visit my blog and hope you like my card. Xx

Wednesday, 21 October 2020

GUILDED AUTUMN, STAMPIN UP


Hi everyone, I have had a couple of busy days, trying to juggle everything.  I now have a planner and I am sticking to it. Hopefully this will help in the future.

The card below is for the #tictactoechallenge.  I went with Harvest, Circle and Fall Sentiment.

My card base is Whisper White, layered with Cajan Craze and then Whisper White again.

The circle was cut using the stitched shaped dies. A sentiment was stamped in the centre.

The leaves were punched out from designer paper and the gold spigs were die cut. They were layered up with dimensionals.

A ribbon was added for effect.


Thank you so much for taking time to visit my blog. If anyone needs more information regarding products used, please visit my Stampin Up website. Details above.


Sunday, 18 October 2020

HIS LOVE SKETCH CHALLENGE - STAMPIN UP


 Hi everyone, hope you've all had a great weekend and done lots of crafting.

Today I have made the card below for the Freshly made Sketch challenge #FMS457.

I used Mint Macaron for my card base, added a piece of designer paper from the Guilded Autumn Suite, embossed a piece of vellum and stamped the cross and greeting from His Love stamp set. Both of these were embossed with gold.

The greeting was mounted on tags cut using the Lovely You punch.

The cross and greeting was mounted using dimensionals to give depth and the pearls were added for decoration.


Thank you so much for stopping by my blog today.  If you wish to purchase any of the products used, please visit my Stampin Up on line store.

Saturday, 17 October 2020

SIMPLE FALL CARD - STAMPIN UP


Hi, this is my Clean and simple fall card for The Spot challenge #132.

I used a card blank in Very Vanilla.  Next I used my new Curvy Dies to cut out the curves in Early Expresso, orange and Bumblebee.  I cut the leaf shapes out in the same colours.

The pumpkins were fussy cut from some designer paper in the Guilded Autumn Specialty paper pack.

Next I stamped my greeting and cut the circle from the stitched shaped dies.

The pumpkins were placed on the card using dimensionals to give depth.


There is a greeting inside the card also and some stamping to finish.


Altogether I am quite pleased with how it turned out as I don't normally do simple cards and had to resist the urge to add ribbons and gems.


Thank you so much for stopping by my blog today.  The Quite Curvy Bundle will be available to purchase on 3rd November as well as the Curvy Christmas .


Tuesday, 13 October 2020


 Hi all,

Has anyone had a chance to play with the new Stampin Up bundle, Quite curvy and Curvy Christmas. This is available to demonstrators now but customers can purchase in November.

It is a great set and the Curvy Christmas is not just for Christmas cards.

Yesterday I used Quite Curvy. I used a basic whisper white card blank and cut out a fancy border from a piece of just jade designer paper.

I sponged the card base with a little bumblebee ink and stamped the tiny leaf stamp randomly around my card.

I attached the fancy border to the bottom of my card and thought what the hell should i do with the left over piece, so i put this on the top of the card, I think this works quite well.

Next I stamped the leaves and two birds and coloured using Stampin blends. I added them to my card using dimensionals and stamped the word hello.

I then added a bit of wink of stella to finish which makes the leaves look frosty and finished with three lots of leaves cut using one of the dies.


Hope you like my card, if you want to see this bundle or similar products, please visit my website, details above.

Colour throwndown challenge ctd638